
Previewing your website at WebOké before you transfer your domain name
Are you moving your website to WebOké while the domain name is still with your current provider? Then you'll still see the old site when you type in your domain. With the free tool Test your website before migrating you can view the new version on our servers before you migrate, without changing anything in your DNS. Your current site simply stays online, and you don't need an account.
There are two ways: viewing in your browser (nothing to set up, works on any device and you can share the link) and the proxy setting (set it up once, then you'll see your site on your own domain exactly as it will be after the migration). Below you'll first read about the differences and then how to use each method, with screenshots and short videos for Windows and Mac.
Which method should you choose?
| Viewing in your browser | Via the proxy setting | |
|---|---|---|
| Setup | None, you're ready right away | Set it up once in your browser or computer |
| Devices | Any device, including phones and tablets | Mainly on a computer |
| Sharing with your client | Yes, with the Share button in the bar | No, everyone sets it up themselves |
| Address in the address bar | A preview address on webokeproxy.eu | Simply your own domain |
| Certificate warning | No | Yes, until the migration |
| How realistic | Almost real: features tied to your domain may behave differently | Exactly as after the migration |
Method 1: viewing in your browser
- Go to Test your website before migrating and choose the View in your browser tab.
- Enter your domain name and click Open. The domain must already be in a package at WebOké; the migration doesn't have to be completed yet.
- Your website opens right away in a new tab, at an address ending in
.webokeproxy.eu.
At the top you'll see a WebOké bar. It shows which website you're viewing, which IP address it comes from and until when the link works (14 days). In the address field of the bar you can type another page, or another domain hosted at WebOké. With Share you copy the link, for example for your client, and with Current site you open the site as it's currently online, so you can compare. If you click through your site, or your site redirects to another domain at WebOké, you stay in the preview.
Good to know: during the preview your site runs under a different address. Features tied to your own domain, such as reCAPTCHA, Google Maps, payments through a payment provider and logging in with Google or Facebook, may therefore behave differently. Logging in to WordPress or a webshop usually works fine. If you want to test everything exactly as it will be after the migration, use method 2.
Method 2: via the proxy setting
With this method you simply open your own domain and see the version at WebOké, as if you had edited the hosts file. On the tool's page, choose the Via the proxy setting tab and follow the steps below.
Why do I still see the old site?
A domain name always points to one place. Your computer first asks your domain's nameservers at which address the website is located. As long as the domain is with your current provider, they return the address of the old server. Web developers often solve this with the hosts file, but that's tricky and not something for a client.
What does the tool do?
Your browser requests the website through our proxy, proxy.weboke.nl. It looks up your domain's address only at WebOké's nameservers. That way you reach the version hosted with us, exactly as if you had edited the hosts file. Only the domains you add in the tool go through the proxy; all other websites simply connect directly.
Step 1: get your personal address
- Put your website in your package at WebOké, for example via FTP or File Manager in DirectAdmin.
- Go to Test your website before migrating and enter your domain name. The domain must already be in a package with us; the migration itself doesn't have to be completed yet.
- You'll get a personal address starting with
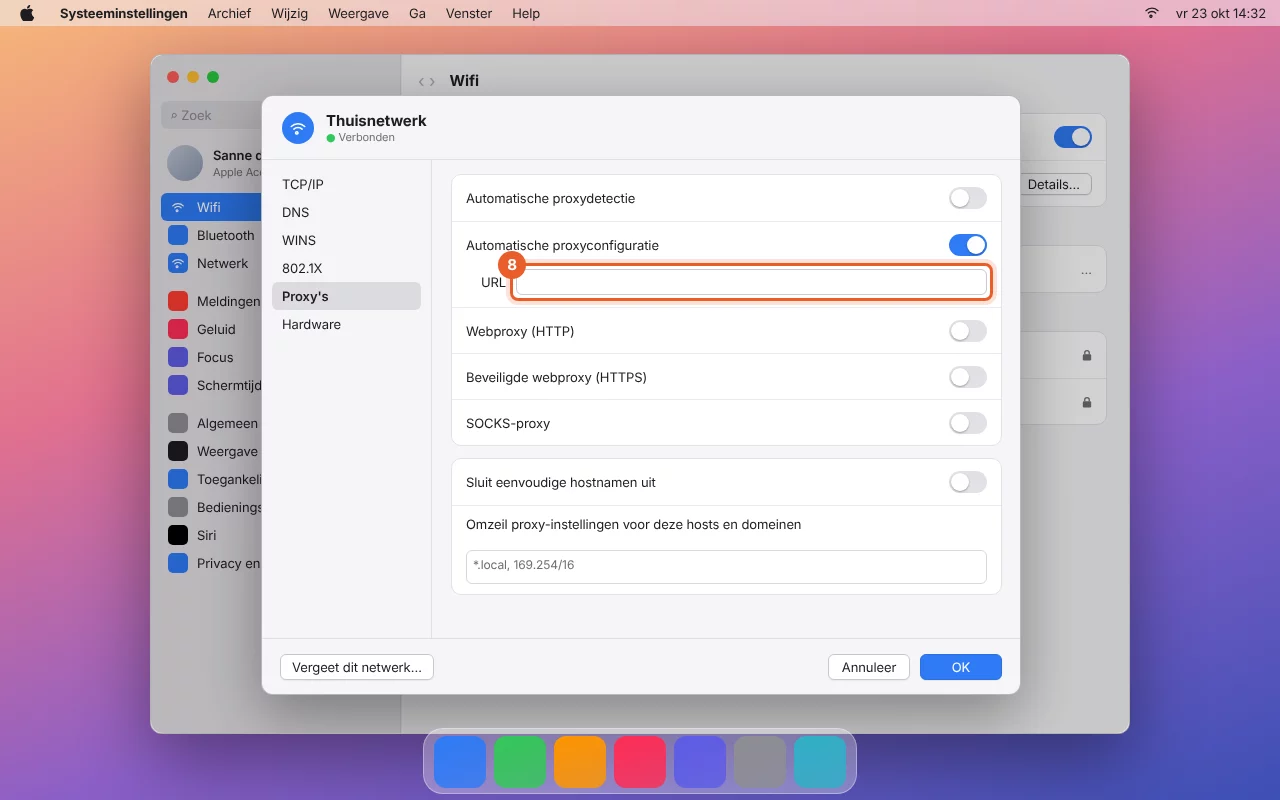
https://proxy.weboke.nl/pac/. Click Copy. You'll paste this address into your computer's proxy setting in a moment.
Don't paste the address into your browser's address bar: it does nothing there. It belongs in the proxy setting, as shown below.
Wi-Fi, network cable or USB network: which connection?
Your computer can be online via Wi-Fi or via a network cable. That cable is sometimes plugged directly into your computer, but often into a USB network adapter or a docking station. This matters for where you configure the setting:
- Windows: the proxy setting applies to Wi-Fi and the cable at the same time, including via a USB adapter or dock. So you only set it up once.
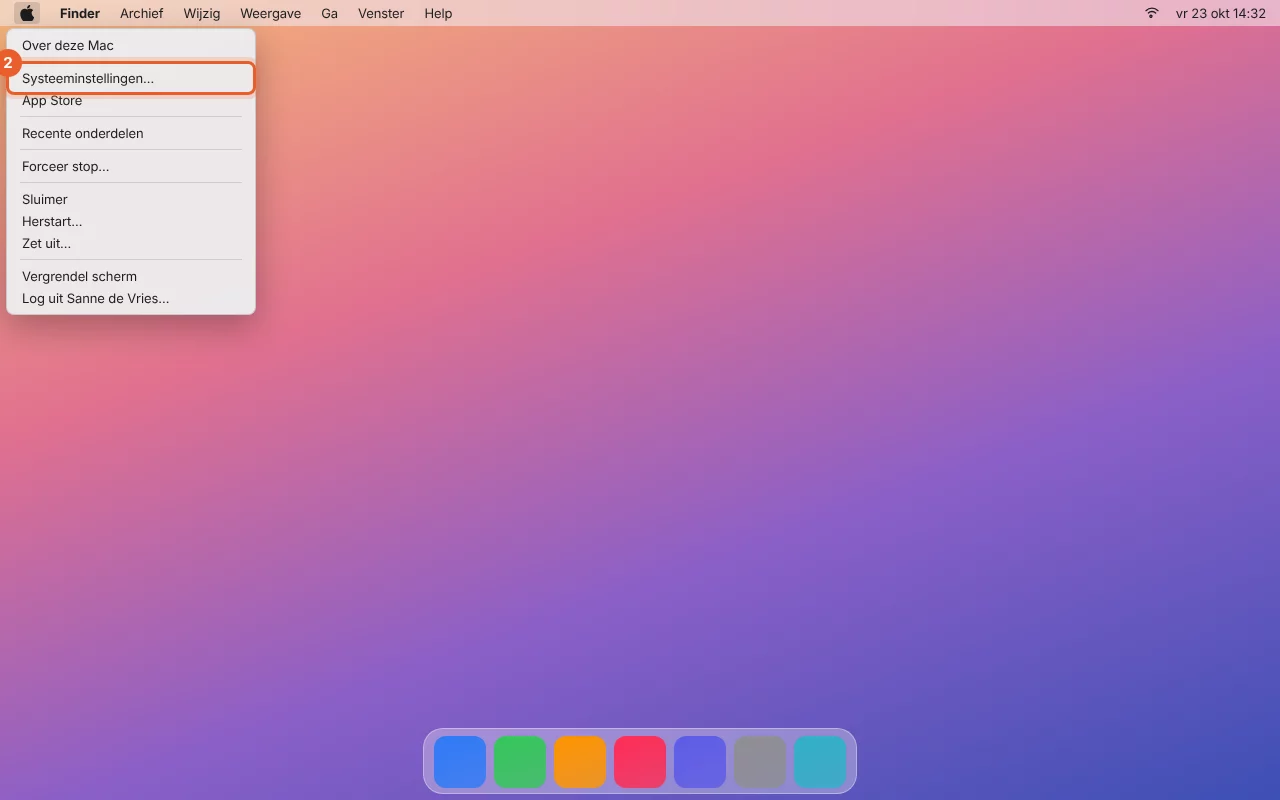
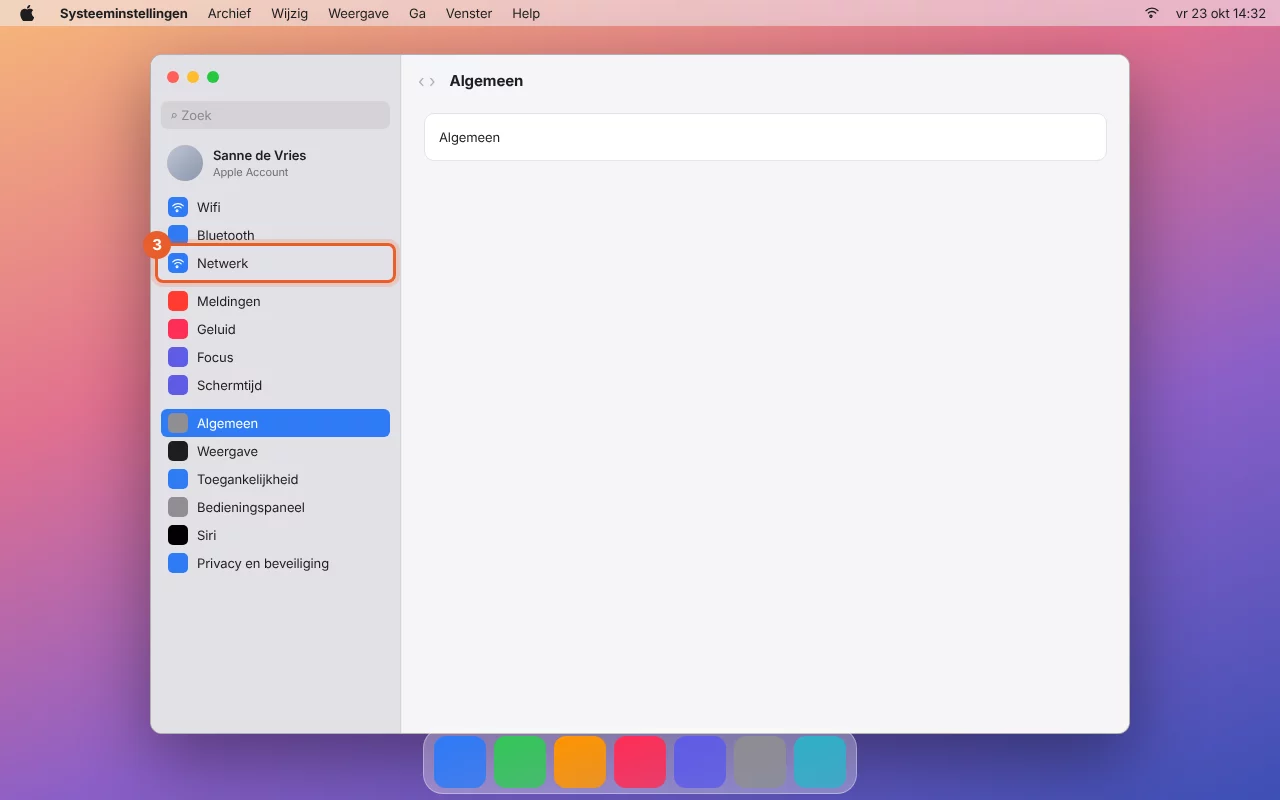
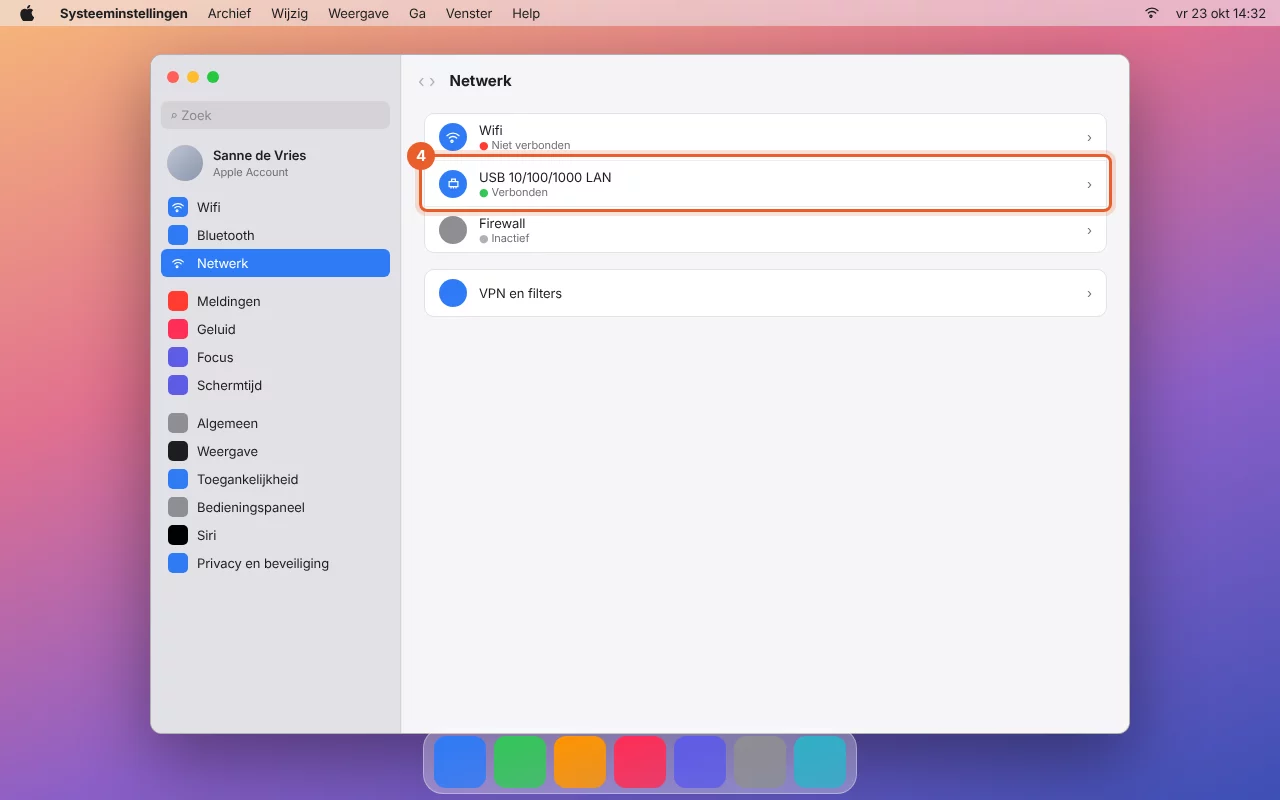
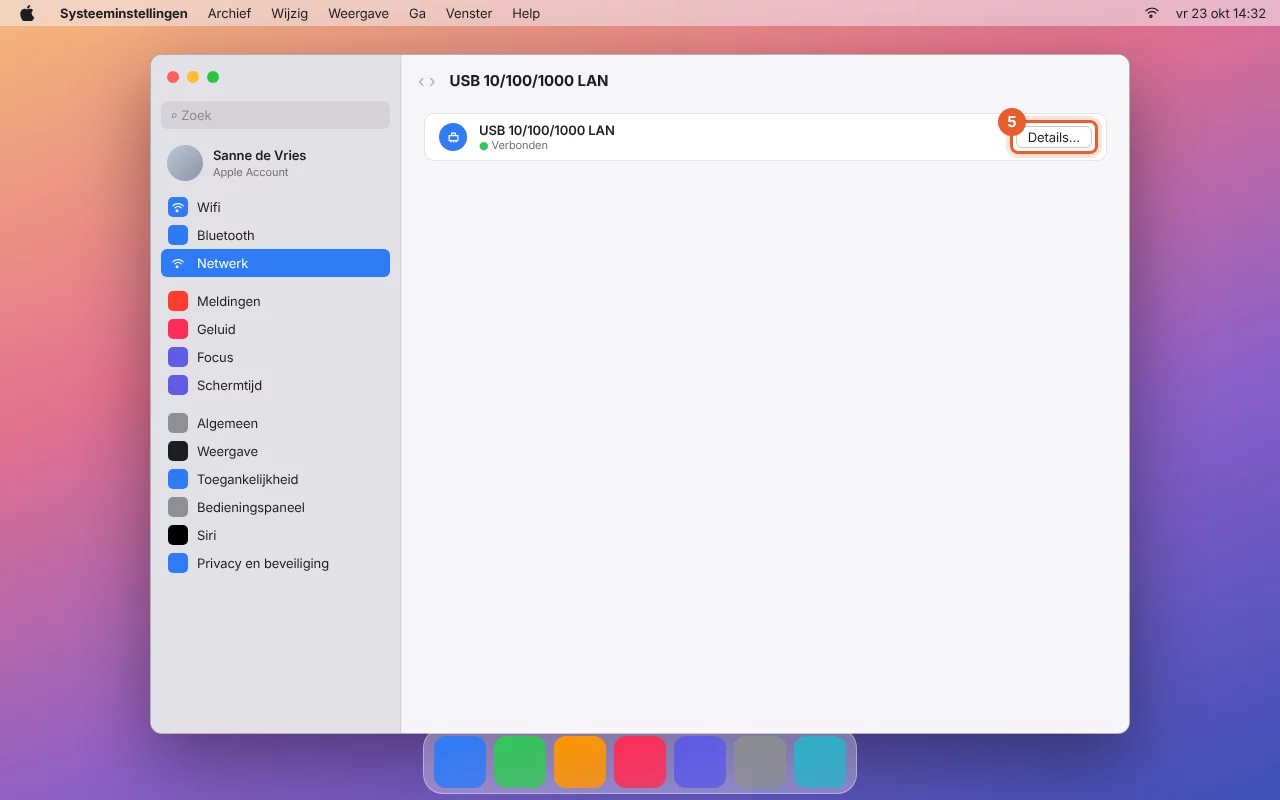
- Mac: each connection has its own proxy setting. Set it up for the connection with the green dot (Connected) under System Settings > Network. That may be Wi-Fi, but also Ethernet, USB 10/100/1000 LAN, Thunderbolt Ethernet or the name of your dock. If you switch connections later, for example from Wi-Fi to your dock at the office, set it up for that connection too. If you see multiple green dots, turn it on for all of them.
- Firefox (Windows and Mac) has its own proxy setting, separate from the connection. That's the easiest option if you switch often or use a VPN.
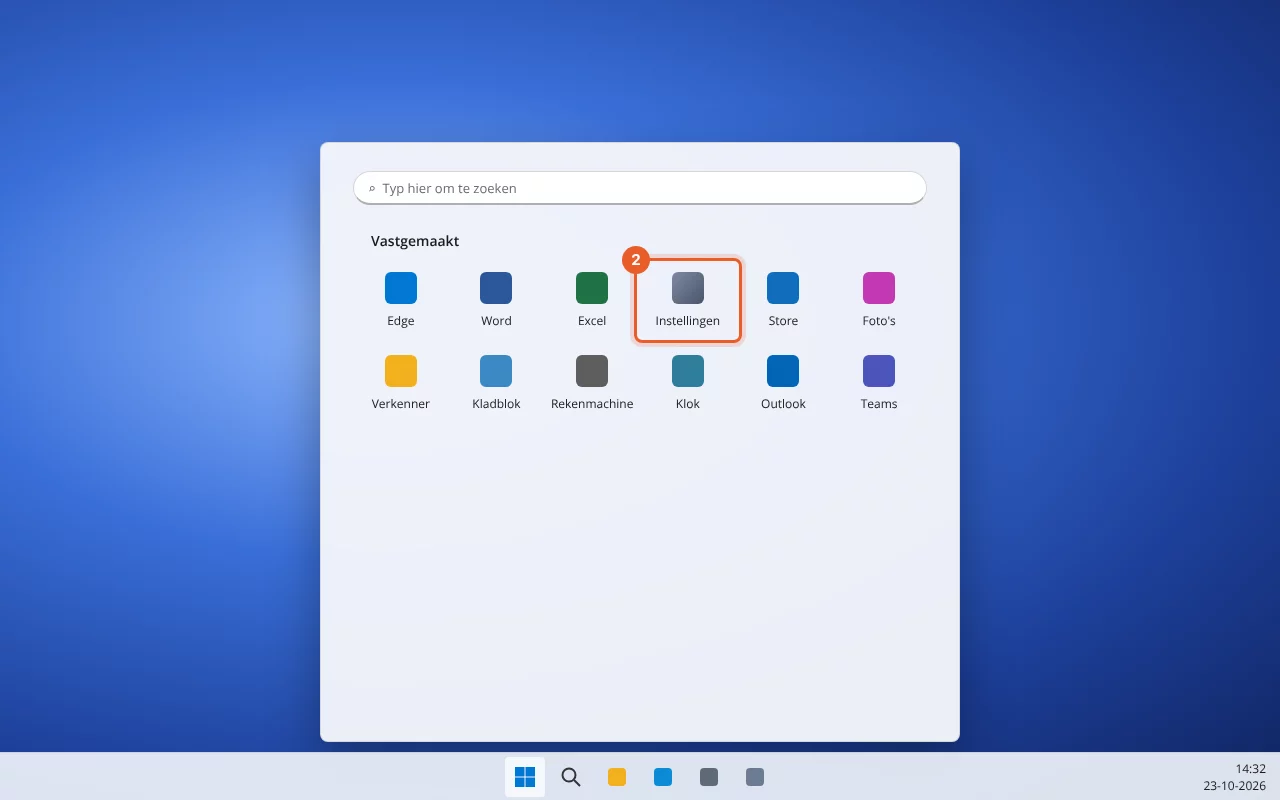
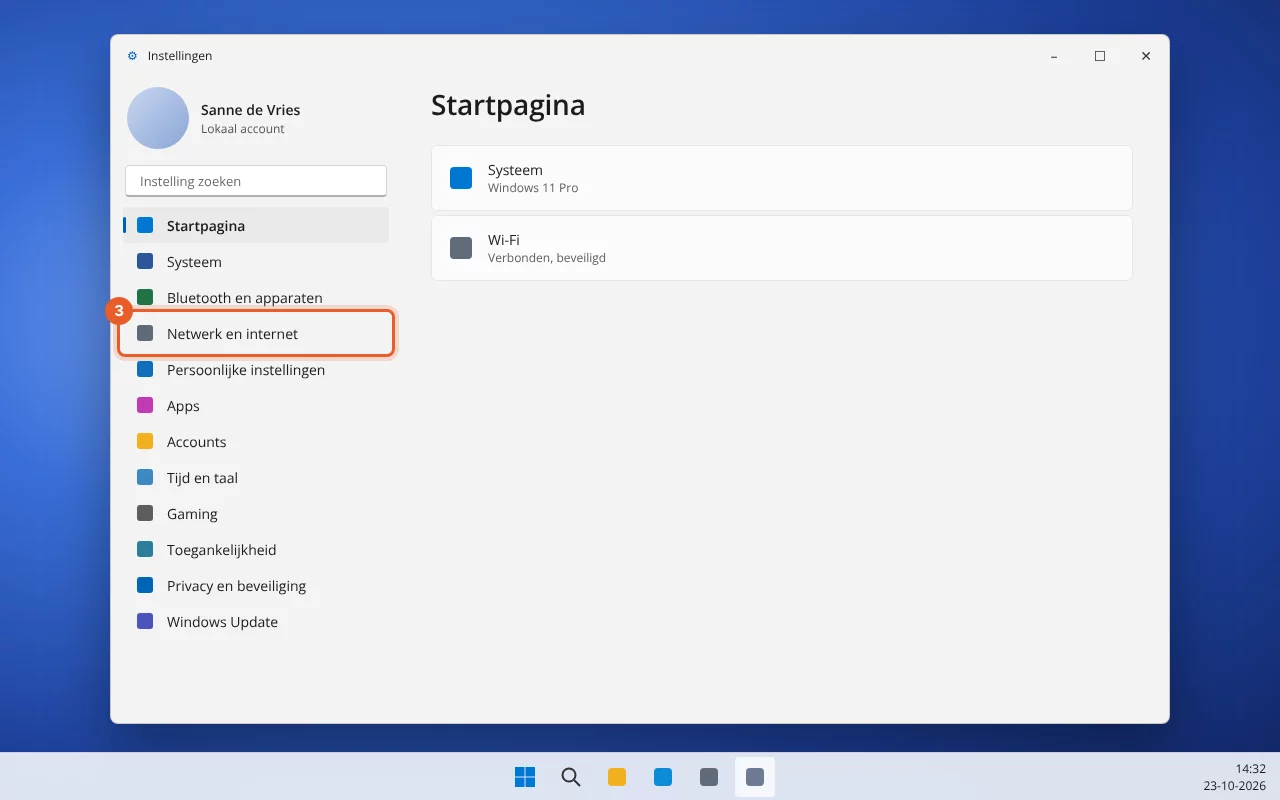
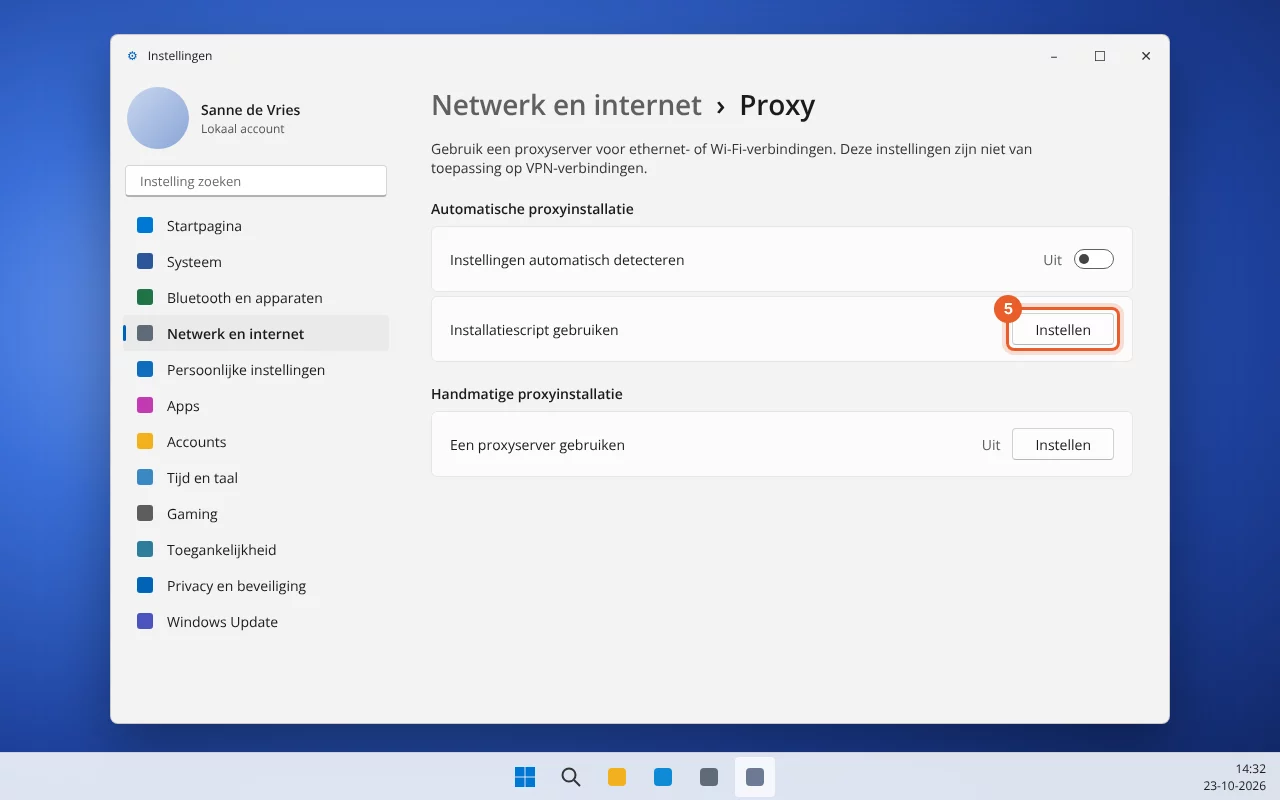
Step 2 on Windows (Chrome and Edge)
Chrome and Edge use the Windows proxy setting. Watch the video, or follow the steps with the screenshots.




Step 2 on a Mac (Safari and Chrome)
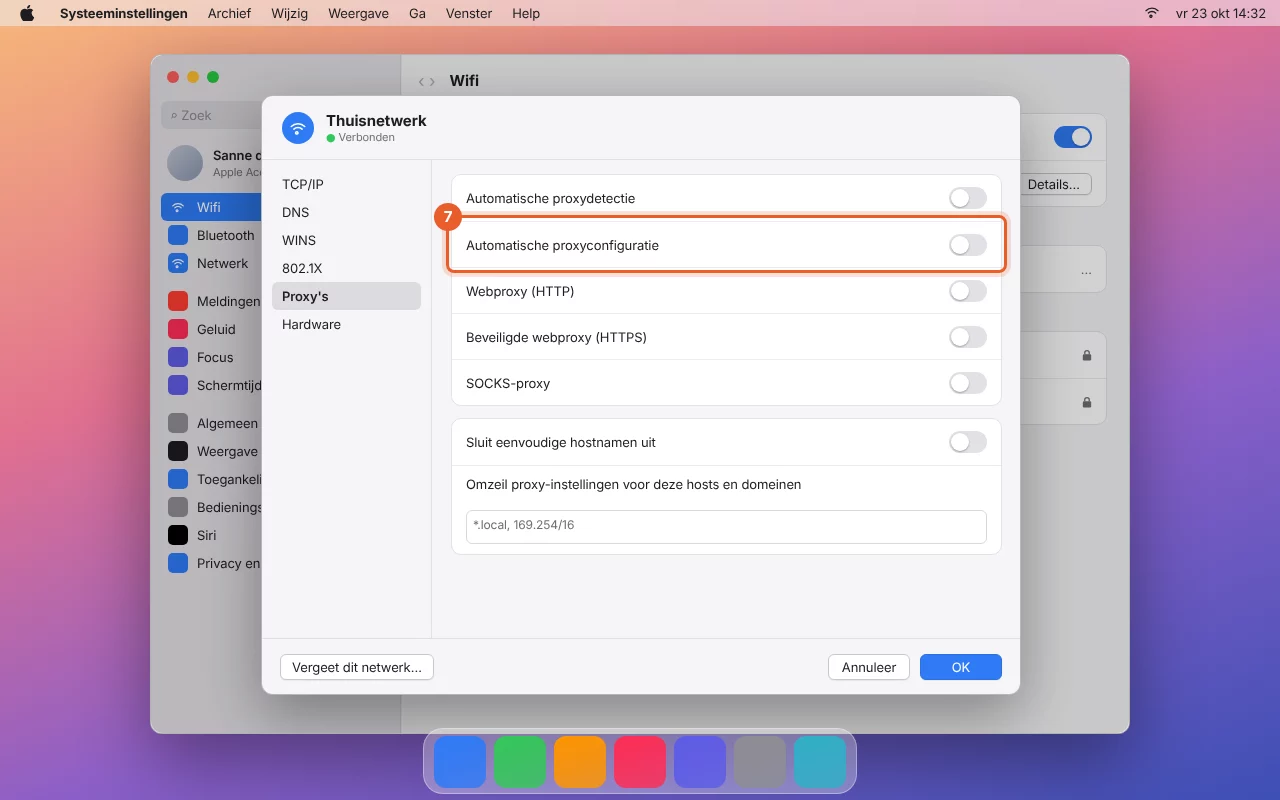
Safari and Chrome use the macOS network settings. Choose the connection you're currently online with: the one with the green dot. Below you'll first find Wi-Fi, then a network cable or USB network adapter.
Via Wi-Fi




Via a network cable, USB network adapter or dock
If you are connected to the network with a cable, the green dot appears next to Ethernet, USB 10/100/1000 LAN, Thunderbolt Ethernet or the name of your dock. The steps are the same, except that in step 4 you choose that connection. The Details… button is then located right next to the connection.
Step 2 in Firefox
Firefox has its own proxy setting. It works the same on Windows and Mac, for every connection and also with a VPN.
- Open Firefox and go to Settings (the menu with the three lines in the top right).
- Type "proxy" in the search field at the top and click Settings… under Network Settings.
- Choose "Automatic proxy configuration URL".
- Paste your address in the field and click OK.
Step 3: view your website
Open your domain in a private window (Windows: Ctrl+Shift+N, Mac: Cmd+Shift+N) or reload the page with Ctrl+Shift+R (Mac: Cmd+Shift+R). You will now see the version hosted at WebOké. On the tool's page, use the At WebOké and Current site buttons to switch between the new and the old version, and see for each domain which IP address the site is currently served from.
A certificate warning is normal
As long as the domain hasn't been moved to us yet, we can't create an SSL certificate for it. That's why your browser shows a warning for https. Choose to continue to view the site. After the move, your site automatically gets a valid certificate. If the site won't let you click through, try http:// for your domain instead.
Still seeing the old site?
- Your browser often still shows a saved version. Reload with Ctrl+Shift+R (Mac: Cmd+Shift+R) or use a private window.
- On the tool's page you can see when your computer last fetched the address. If it says it hasn't been fetched yet, check that you entered it in the proxy setting and not in the address bar.
- Mac: is the setting on the connection that currently has the green dot? If you switch from Wi-Fi to cable or a dock, you need to set it there too.
- Chrome and Edge: go to chrome://net-internals/#proxy (or edge://net-internals/#proxy) and click Re-apply settings, or close the browser completely and start it again.
- Using a VPN? Then your computer often ignores the proxy setting in Windows or macOS. Use Firefox instead.
Prefer the hosts file?
Are you a web developer who prefers working with the hosts file, or are you moving a site from one WebOké server to another? Then you can also tell your computer yourself which IP address your domain is on. The tool looks up the address with our nameservers, and during a move like that they still point to the old server.
- Look up your server's IP address. You'll find it in DirectAdmin under DNS Management, next to your domain's A record.
- Add two lines to the hosts file, each with that IP address, a space and your domain: one for
jouwdomein.nland one forwww.jouwdomein.nl.- Windows: open Notepad as administrator and open
C:\Windows\System32\drivers\etc\hosts. - Mac: open Terminal and type
sudo nano /private/etc/hosts. Save with Ctrl+O and Enter, close with Ctrl+X and then typesudo dscacheutil -flushcache.
- Windows: open Notepad as administrator and open
- Restart your browser and open your domain.
Remove the lines again once the domain has been moved. Otherwise your computer will keep going to that IP address, even if your site moves later.
Stopping
Done testing? Turn the setting off again in the same place: in Windows the "Use setup script" switch, on the Mac "Automatic proxy configuration" (on every connection where you turned it on), and in Firefox choose "Use system proxy settings" again. You can also click Stop testing in the tool. After 14 days it stops automatically: your browser then goes directly everywhere again.
The screenshots and videos are recreations and may differ slightly depending on your version of Windows or macOS.