
Managing DNS records in My WebOké (with examples for CNAME, TXT and external services)
DNS records determine where your domain name points: which server your website runs on, where your email is delivered and which services are allowed to use your domain. In My WebOké you manage the DNS of your domains entirely yourself. This article explains how that works, with examples for CNAME and TXT records and for connecting an external service.
Viewing and editing DNS records
- Log in to My WebOké.
- Go to My Domains and choose the domain you want to manage.
- Open the DNS tab. You'll now see all records of your domain.
- Click + Add record for a new record, or Edit or Delete next to an existing record. All common record types are supported, such as A, AAAA, CNAME, MX and TXT.
In the window, fill in the Name. For the domain itself, type @. For a subdomain, type only the first part, for example www or shop: your domain name is added automatically. The full name is shown below the field.
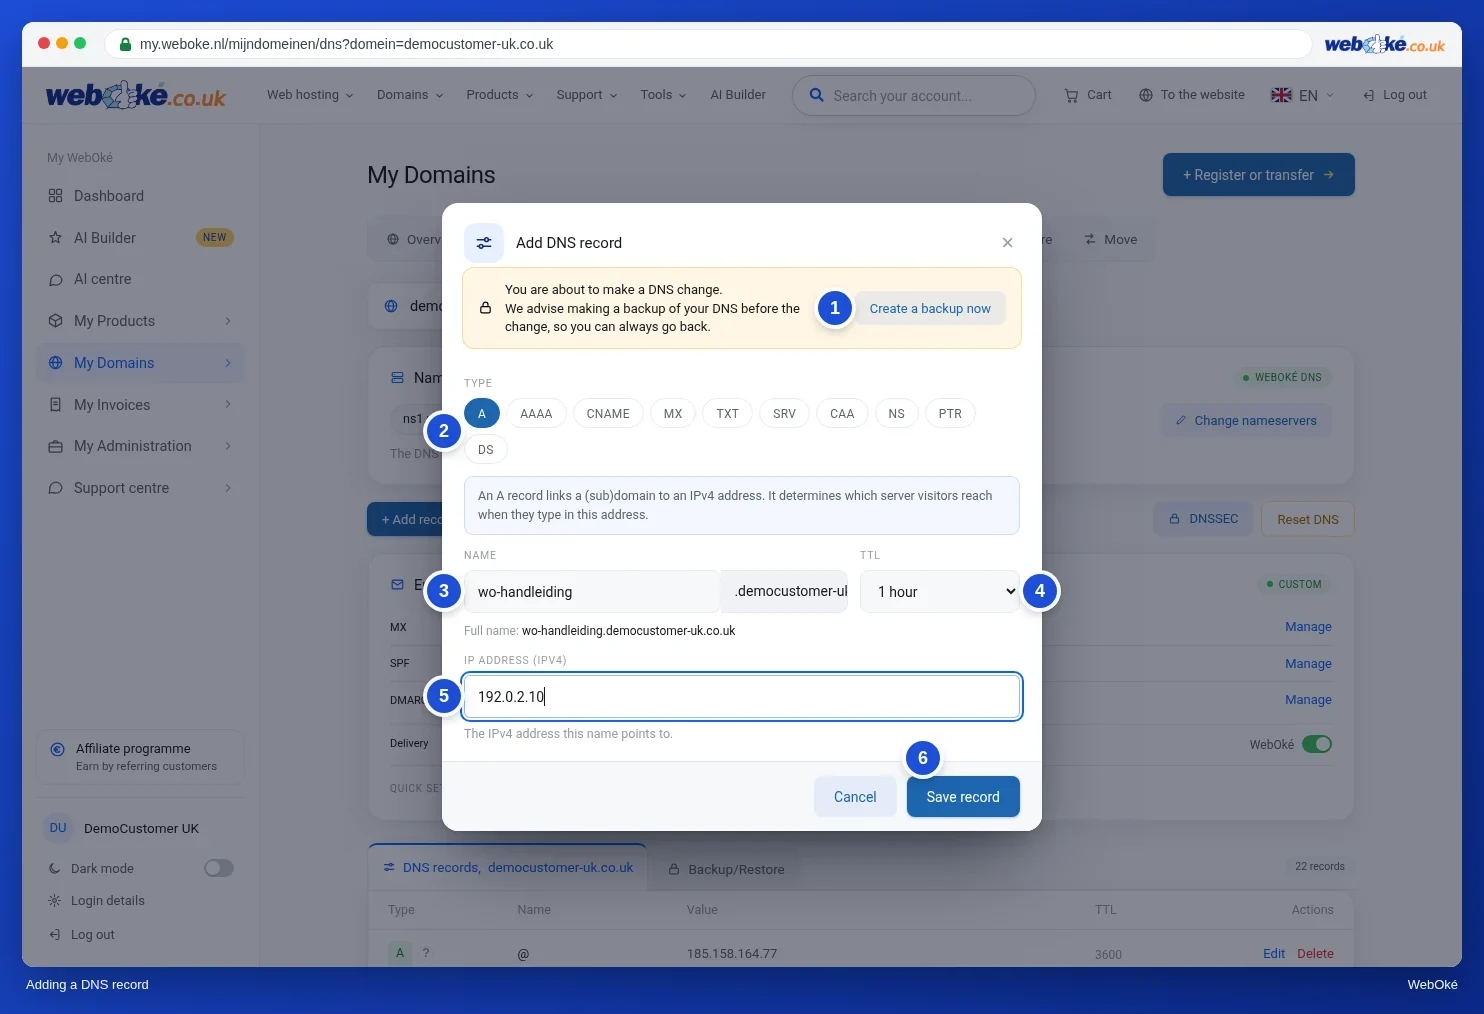
Make a backup first
Are you making bigger changes, such as pointing your website to another server or changing email records? Then make a backup of your DNS first. The window has a Make a backup now button for this and also reminds you. If something goes wrong, you restore the backup and everything works as before. Read how this works in Making and restoring a backup of your DNS.
Example: a CNAME record
A CNAME record points one name to another name. Webshop platforms, newsletter services and Microsoft 365 often ask for one. Say you want shop.yourdomain.nl to point to shops.voorbeeldplatform.com.
- Click + Add record and choose the type CNAME.
- Under Name, fill in only shop, so without your domain name.
- Under Points to, fill in the target name, with a dot at the end: shops.voorbeeldplatform.com.
- Click Save record.
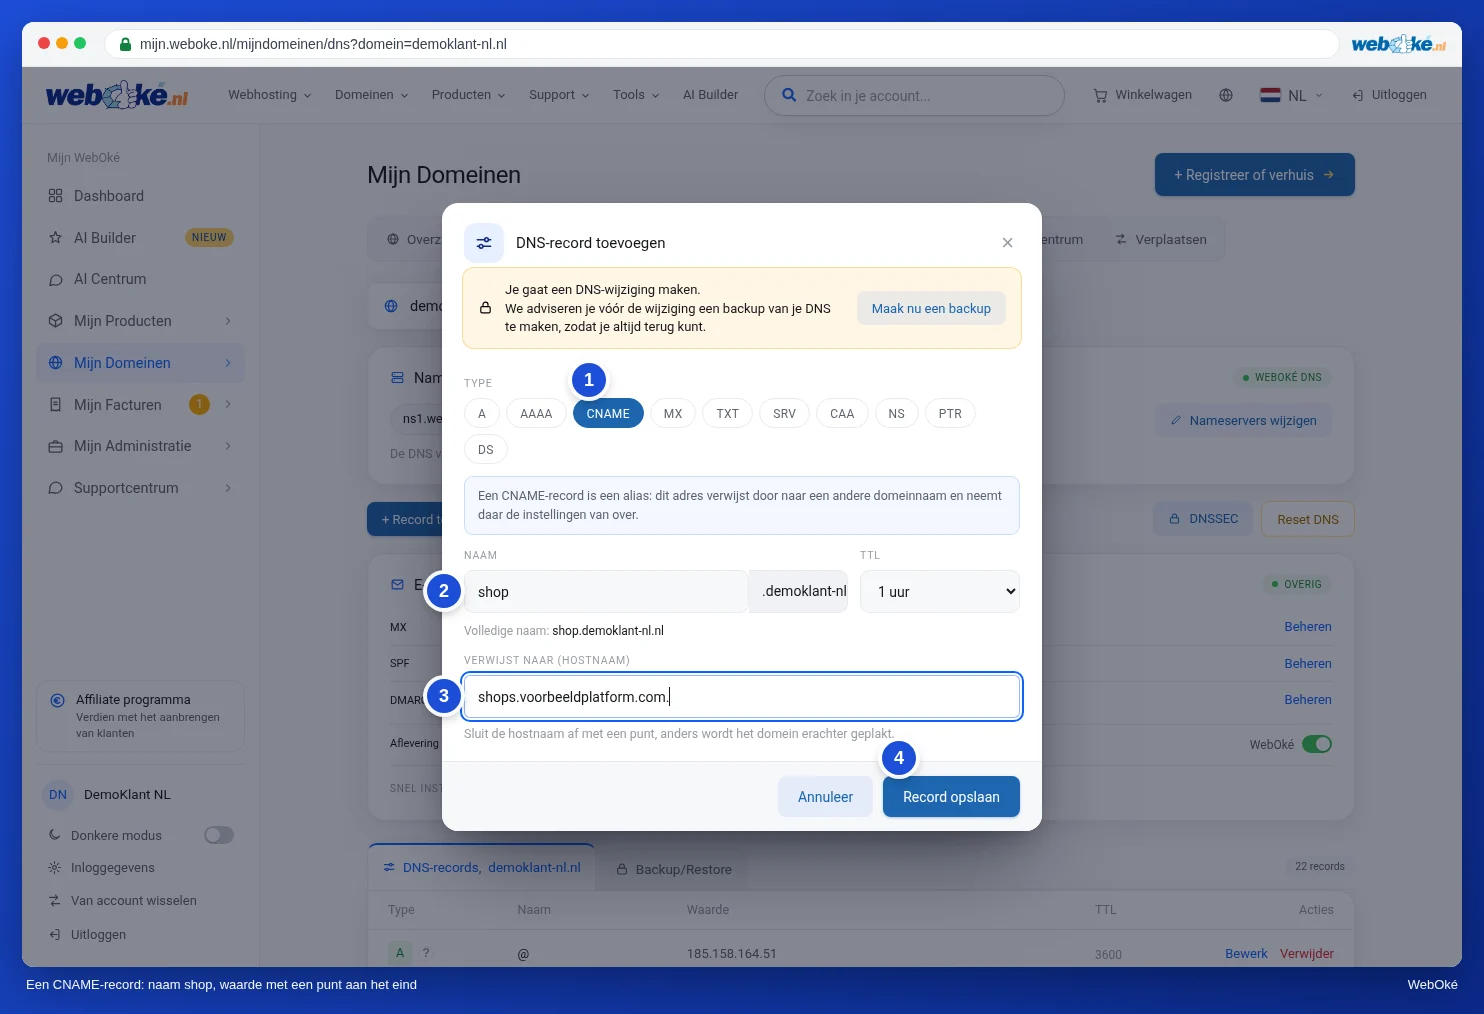
Type: CNAME Name: shop Value: shops.voorbeeldplatform.com.
What can't you do with a CNAME?
- No CNAME on the domain itself (@). That's also where your MX and NS records are. If a service asks for your main domain, use an A record with the IP address the service provides. Other options are described in CNAME records and the dot at the end.
- No CNAME next to another record with the same name. If there's already an A record for shop, delete it first.
More information: CNAME records and the dot at the end.
Example: a TXT record for verification
Services such as Google Search Console, Microsoft 365, Google Workspace and Facebook want to know whether the domain is yours. They give you a code that you add to your DNS as a TXT record.
- Click + Add record and choose the type TXT.
- Does the service ask for a record on the domain itself (or on @)? Then fill in @ under Name. Does the service ask for a specific name, such as _github-challenge-yourcompany? Then fill in only that name, without your domain name after it.
- Paste the code you received from the service as the value. You don't need to type quotation marks.
- Click Save record. Then go back to the service and click verify there.
Type: TXT Name: @ Value: google-site-verification=abc123...
You can have multiple TXT records side by side, even with the same name. Only an SPF record (starting with v=spf1) may appear just once. More information: TXT records for verification.
Is Google Search Console verification not working? The mistakes we see most often, such as a wrong name, a record on www or extra quotation marks, are covered in Verifying Google Search Console with a TXT record: how to avoid mistakes.
Bing Webmaster Tools doesn't ask for a TXT record but for a CNAME record. Under Name, fill in the code Bing gives you, without your domain name after it, and under Points to fill in verify.bing.com. with a dot at the end. It's easier to import your site into Bing from Google Search Console. Bing then verifies it automatically and you don't need to add anything to your DNS.
Connecting your domain or email to an external service
Do you use a webshop platform such as Shopify, or do you send newsletters through a service like Mailchimp, MailerLite or Brevo? Then that service will ask you to add a few records. Always copy exactly what the service specifies.
- Website or webshop hosted elsewhere: usually an A record for your main domain (@) with the IP address of the service, and a CNAME record for www or a subdomain such as shop. See Adding or changing an A or AAAA record. A step-by-step guide with the records for Shopify, Wix and Squarespace can be found in Your website at Shopify, Wix or Squarespace, your domain and email at WebOké.
- Verification: a TXT record with a code, as described above.
- DKIM for a newsletter service: usually CNAME or TXT records with a name like k1._domainkey. Copy the name without your domain name after it, and for a CNAME add a dot at the end of the value. See Enabling and checking DKIM.
- Extending SPF: if the service sends mail on behalf of your domain, don't create a second SPF record, but extend the existing record with the service's include:. Keep include:webawere.nl, because your website and forms send mail through our servers. See Setting up and extending SPF.
v=spf1 a mx include:webawere.nl include:spf.voorbeelddienst.com ~all
Checking that it works
Changes are applied immediately. Due to DNS caching (the TTL of a record), it can take up to an hour before everyone on the internet sees the change, in exceptional cases up to 24 hours. Is a verification not working right away? Wait fifteen minutes and try again.
Want to see whether your records are set up correctly? On the domain page in My WebOké, open the Domain / Email health card and click Check again, or use the public Domain health tool. See also Domain and email health: checking and fixing.
Good to know
- There's a question mark next to each record type in the list. Click it for a plain-language explanation of what that record does.
- For MX, SPF, DMARC, CAA and SRV, the window offers extra help. See DNS helpers: MX, SPF, DMARC, CAA and SRV.
- Not sure which record you need? Feel free to contact us through the Support Center and we'll help you figure it out.
You might enjoy reading: The history of the domain name
See also in the WebOké manual: Managing DNS: adding, changing and deleting records. In the DirectAdmin manual: Opening DNS Management and reading the records.
Detailed explanation with screenshots: DNS in My WebOké and with external nameservers such as Cloudflare in the DirectAdmin manual.
Want to learn more? Take the free course Getting found online, lesson 2.1 Google Search Console: adding and verifying your site.